W8 Contact Form
Documentation
Table of Content
- Item Name : W8 Contact Form for WordPress
- Minimum Required : WordPress Version 3.9
- Author by : Pantherius
- Support via Email : Contact Link
Thank you for purchasing my plugin. If you have any questions that are beyond the scope of this help file, please feel free to email via my user page contact form here.
Animated Contact Form with multiple contacts and unlimited contact forms. W8 Contact Form ensures a professional system to get in touch with your customers easily. You can highly customize the entire form with optional image, description and social links, also possible to send different auto-reply message for each contacts or set it globally. The plugins ensures you will never lose any message, just set the logging on and the emails will be saved and you can read them directly on your WordPress admin area.

Install Guide #back to top
If All files & documentation has been downloaded, then you need to unzip the file to get the installable WordPress Plugin ZIP file.
Upload via WordPress Admin
Use your WordPress Administration Page to browse and upload the plugin ZIP file. Pay attention to upload the correct ZIP, otherwise you will get an error message. If it happen, please unzip the downloaded file and upload the inner ZIP file since that will be the installable WordPress package.
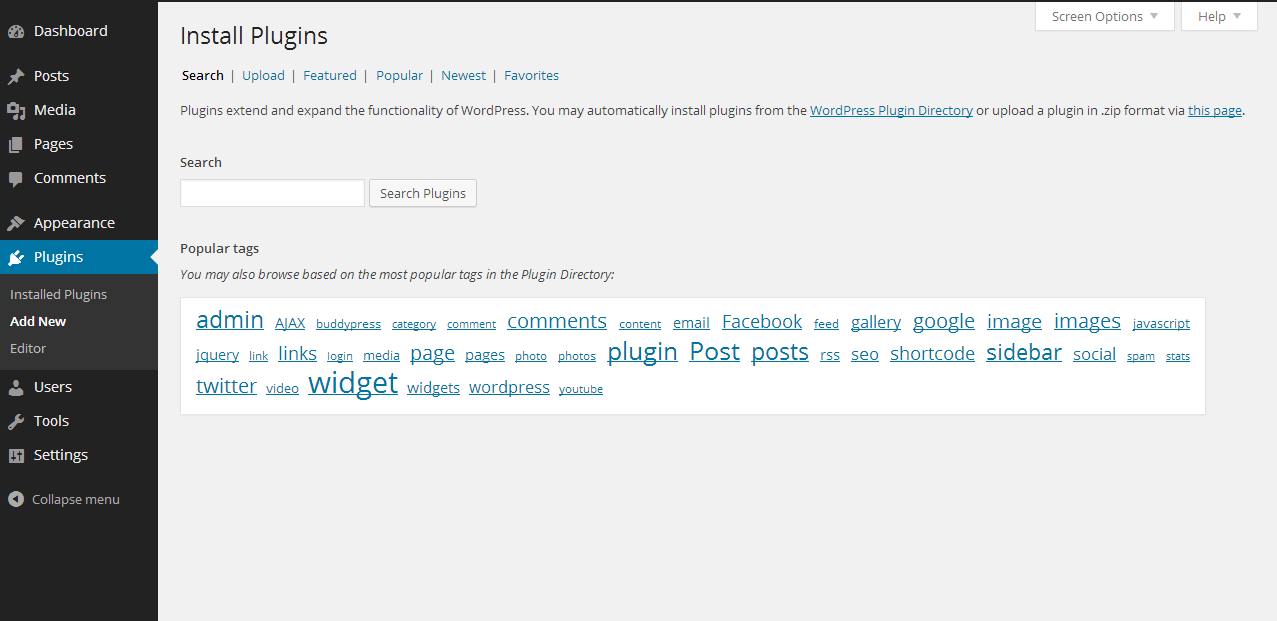
Add New - #back to top
First, log in to the Administration area of your Wordpress website and select Plugins then Add New.

Browse - #back to top
Select Upload on the top of the page, browse the plugin ZIP file and click on the Install Now button.
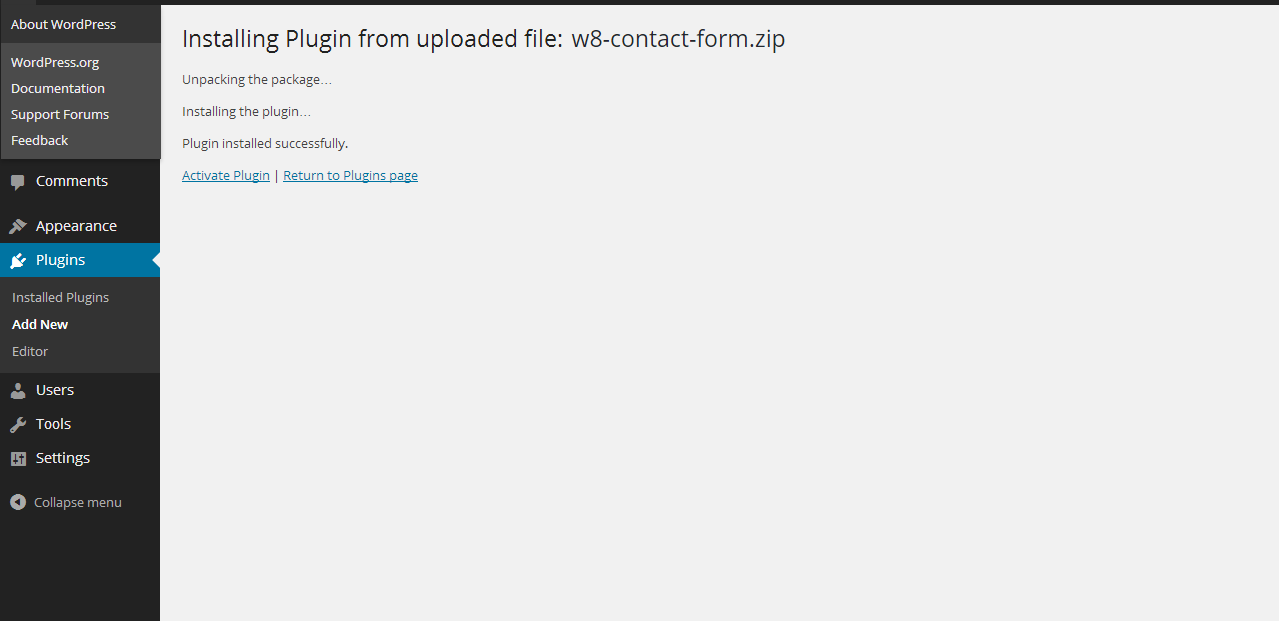
Upload - #back to top
Click on the Activate Plugin link and the plugin will be active. After successful plugin activation, you will be redirected to the plugins' list page.

Activate - #back to top
Find the W8 Contact Form plugin in the list. You can now configure the Contact Form.
Upload via FTP
Unpack the plugin ZIP file to a folder, then copy all files with the w8-contact-form directory to your website wp-content/plugins folder.
Login to your administration area and activate the plugin.
General Settings #back to top
The first thing you need to do to specify the sender email address in the General Settings. This email address will be visible for you when you get a contact message and it needs to be ending with you domain name. There is not neccessary to define an existing email address.
- Sender name: This name will be appear for each email you got from the plugin.
- Sender Email Address: You will got the contact emails from this email address. If you enable the 'sending copy' option the customers will also get the emails from this address.
- Hide icon: You can set to invisible the Contact icon if you choose the ON option.
- Lock Screen: Displays a dark background on the entire page behind the opened Contact Form.
- Display Close Icon: You can hide or show the close icon at the corner of the form. The contact form can be also closeable with clicking on the locked background or on the Contact Icon.
- Background Transparency: Darkness of the locked screen. (works only when Lock Screen in On)
- Display one per user: It is only related with setting Auto-open. (see below) If you set it on, then it will be opened automatically only once for each users.
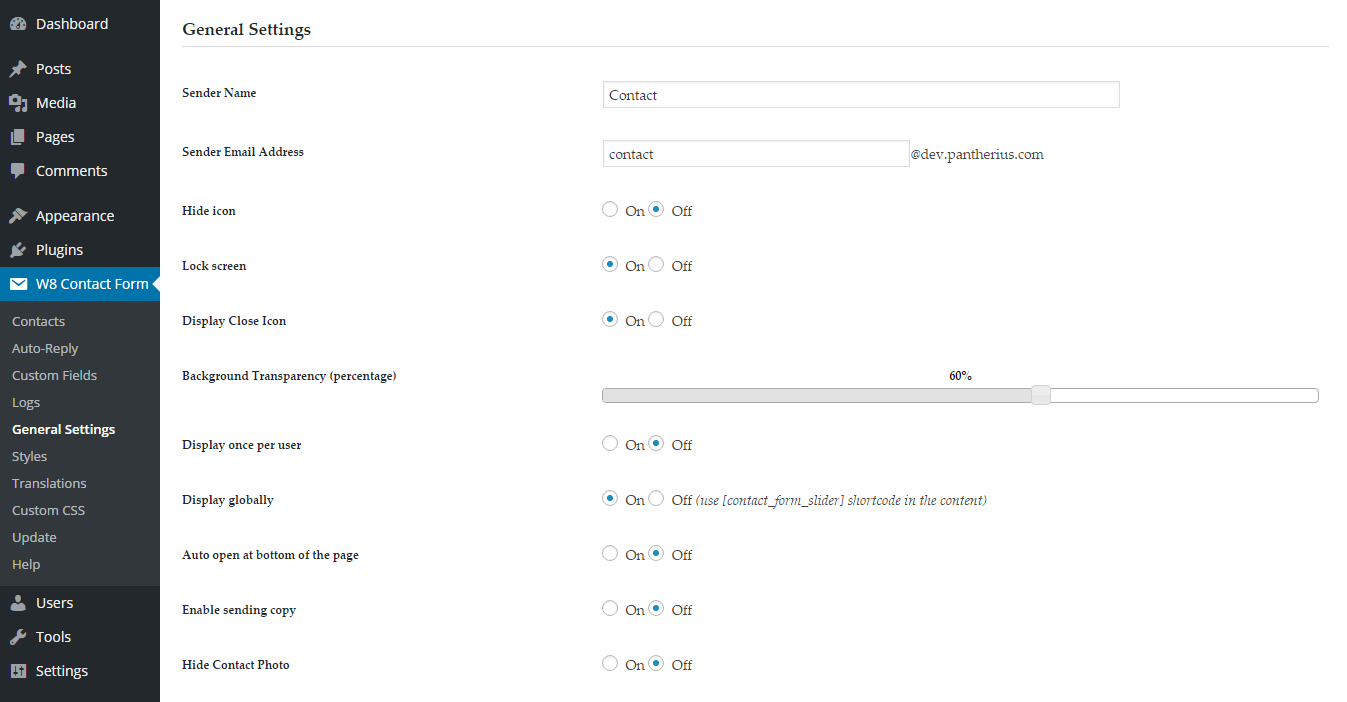
- Display globally: The Contact Form will be appear everywhere on your website, excluding the login, registration and 404 pages.
- Auto open at bottom of the page: The Contact Form will automatically open when the visitor almost reach the bottom of the page. You can use it with Display once per user option to open automatically once.
- Enable sending copy: The visitors will see a checkbox on the form, therefore they can choose to get a copy of the message to their own email address.
- Hide Contact Photo: Hides the contact's photo in the header part of the Contact Form.
- Captcha: Image mode is the standard, server sided captcha, Math mode using Javascript. Robots usually try to fill all fields, therefore if you using the hidden field mode the plugin will check that hidden field and only pass the form when the field is empty. (Doesn't filled by the robot.)
- Disable on mobile: Doesn't display the Contact Form on lower resolutions.
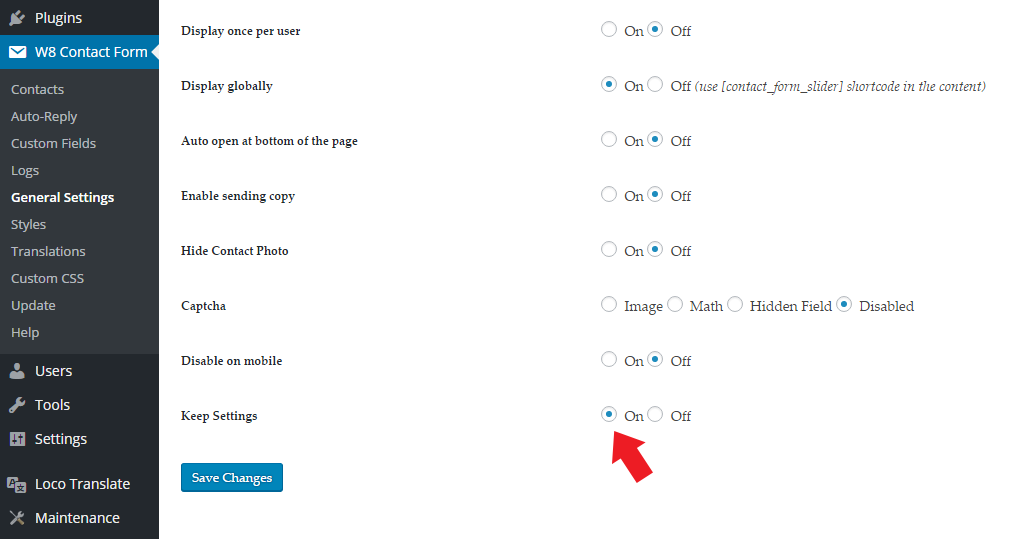
- Keep Settings: Set this on, when you would like to keep all settings during the uninstall. Recommended to use it for installing updates easier.
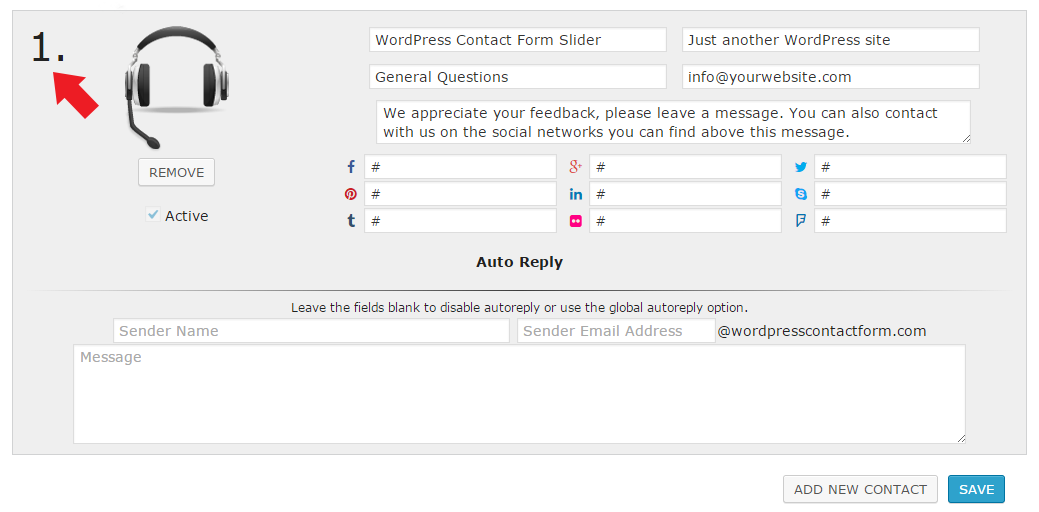
Contacts & Recipients #back to top
The first contact can't be deleted or set to passive, because the plugin needs at least one contact to work. You can easily customize them with editing the input fields and only that social icon will appears on the form that has a value. (Keep it empty to hide)
It is possible to set different Auto Reply options for each contacts. The plugin check the contact's Auto Reply settings, then check the Global Auto Reply (see under the Auto Reply menu), therefore the contact's auto reply has the first priority. The email address that used to send emails from your website need to ends with your website's domain name. It is a WordPress security setting.
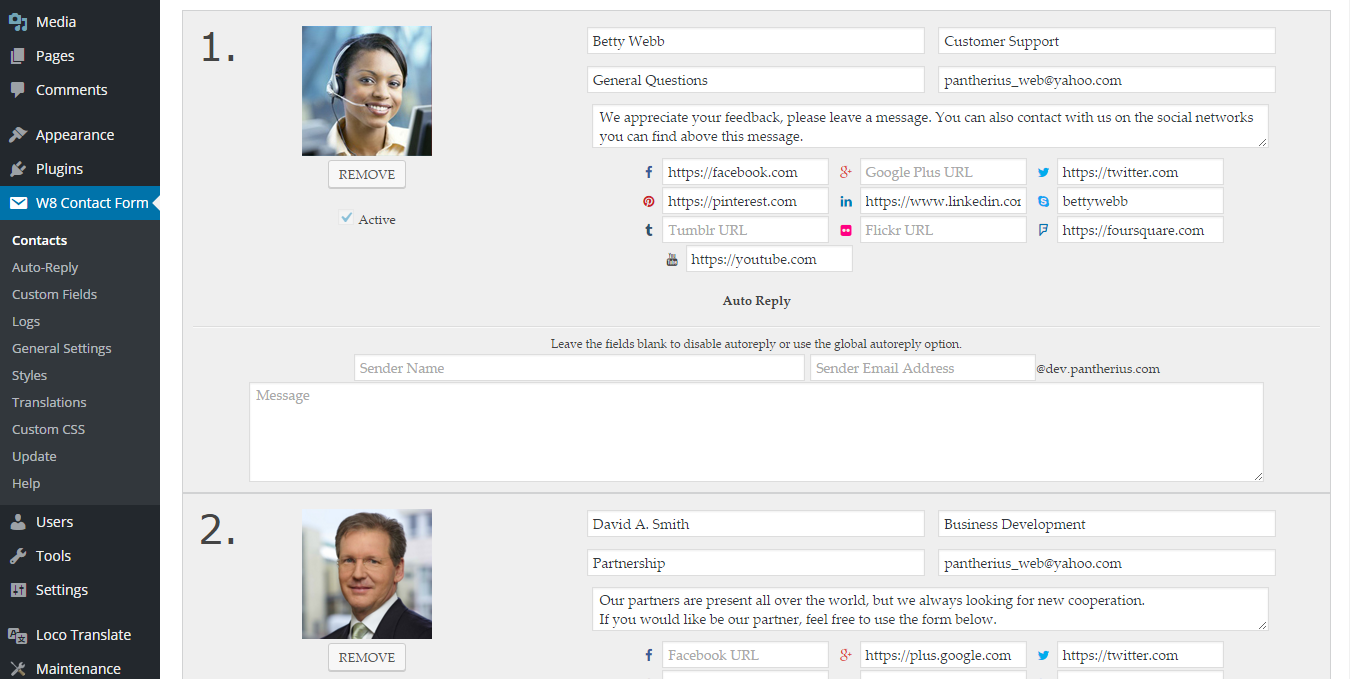
The contact's photo size will be reduced to 130 x 130px, it is strongly recommended to use this size when you upload your own contact photos.
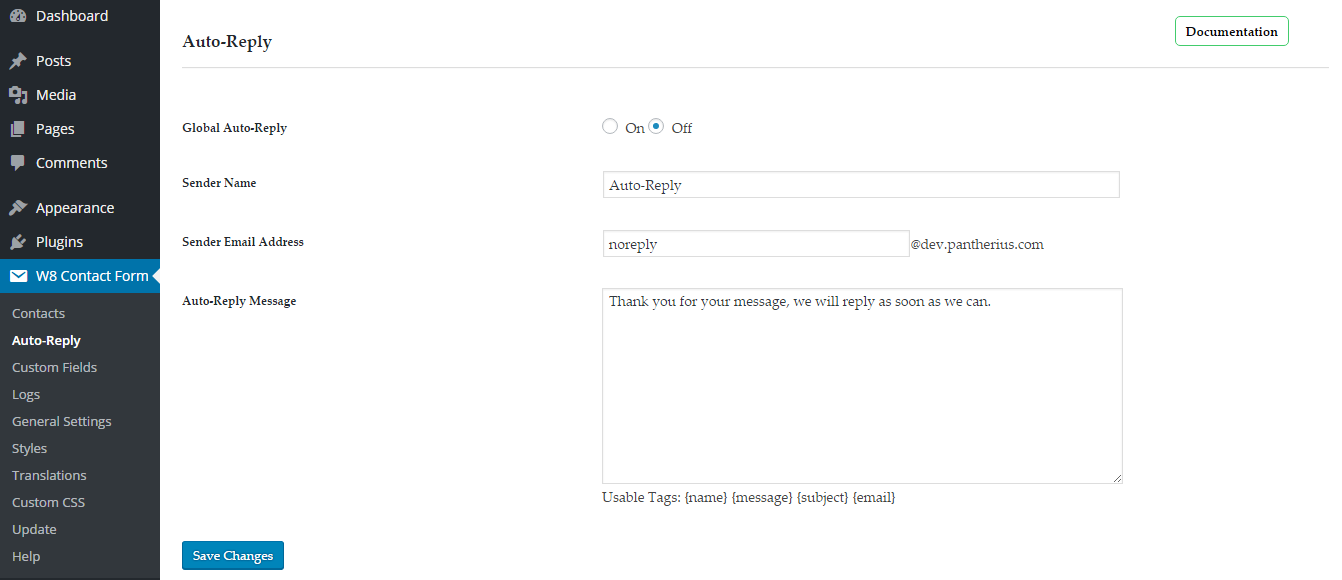
Auto-Reply #back to top
You can set the global Auto-Reply option to ON or OFF at the top of the screen. If the contact doesn't has a filled auto-reply and you set the global auto-reply ON, the plugin will use these fields to compose the Auto-Reply message.
W8 Contact Form is able to use the visitor's datas in the auto-reply message, to use this feature, you can add the following optional tags to the Auto-Reply Message field: {name} {message} {subject} {email}
The email address needs to be ended with your website's domain, therefore it is predefined setting. This is a default WordPress security rule.
Styles and Appearance #back to top
Set the global appearance of the Contact Form.
- Icon Vertical Distance: Vertical position of the Contact Form Icon at the side of the screen in percentage. It need some space on the top and the bottom parts, therefore you can specify between 5% and 95%
- Icon Size: The default icon is available in three sizes, this option will works with the default icon. If you using your own custom icon, you will use that with the sizes you uploaded.
- Direction: Define the side of the screen where the W8 Contact Form will be appear.
- Icon URL: You can use any format that is acceptable on the WEB (jpg, gif, png, etc.) and you can also upload it with any size. The plugin will use the original size of the uploaded image. You can't use the Icon Size setting with your custom icon image.
- Animation: Choose the open and close animation from the list.
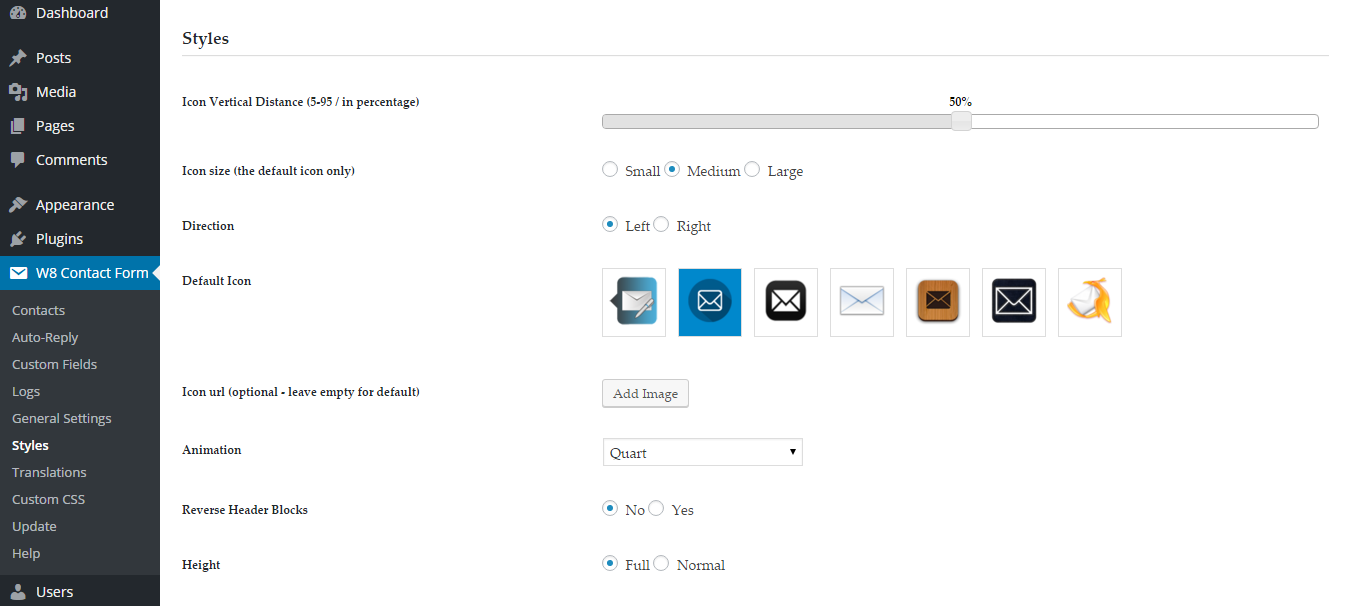
- Reverse Header Blocks: By default, the contact's image is on the left side and the title, name and other informations displayed on the right side. This setting is allow to reverse this order.
- Style: Select the color style of the Contact Form.
- Skin: You can use the form with the default or the minimal predefined skin. Experts can customize the CSS file to create custom skins.
- Photo Style: Different predefined border styles for the contact's image.
- Photo Border Color: Disable or set a custom contact's image border color with RGB Color Picker.
- Icon animation: It is possible to set an animation for the Contacts Icon. Shake animation time can be customized with this option.
Custom Fields #back to top
W8 Contact Form allows you to add your own custom fields to the contact form. Simply click on the button at the bottom of the page, then fill out the ID and NAME values (marked with star)
The first input area is specify the priority order on the public form. If you would like to add your own field to the top of the form, set 1 value as priority. If you want to add the field right below the default subject select box, the set 2 value as priority and so on. You can also use the same values for different fields, in this case the plugin will use the order of the fields on the admin screen to determinate the correct priority.
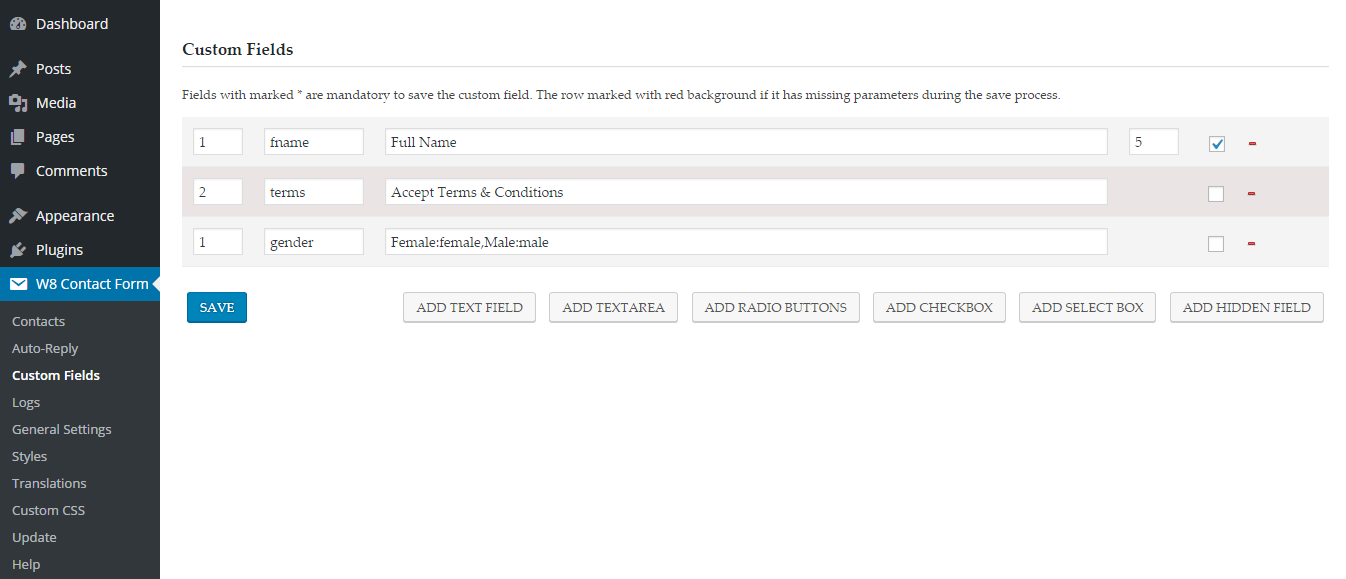
After you defined the NAME value (third input), you can set the minimum character length for text and textarea fields. These are applied only when you check ON the 'required' checkbox at the end of the line.
Translations #back to top
The plugin follow the WordPress Multilanguage Standards, therefore it is fully compatible with WPML. You may translate the texts in the plugin with any 3rd party WordPress translator plugin or with Poedit. (POT file included)
Alternatively, it is also possible to set the placeholders' texts in this menu. If you would like to use WordPress default localization, you can enable it at the bottom of this page. The whole admin area is also translatable by WPML, only the frontend area depends on this settings.
Logs #back to top
You can enable logging with setting Logging Status to ON, then all activity will be saved to the logs. With this option, you can get all emails here even your email address is temporary doesn't works. Pay attention to the size of the logs, hundreds or thousands of log entries can be slows down your website, therefore don't forget to clear the logs periodically.
The plugin keeps the log file after uninstalling if you set the Keep Logs option to ON. It is recommended to use before you updating it to a new version.
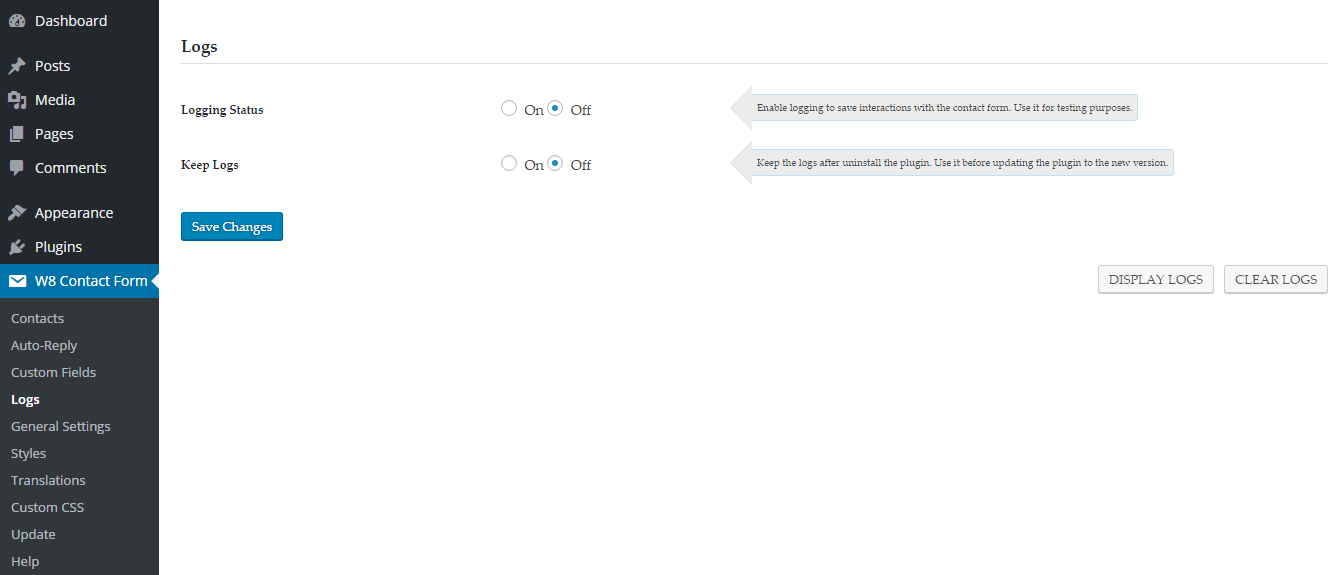
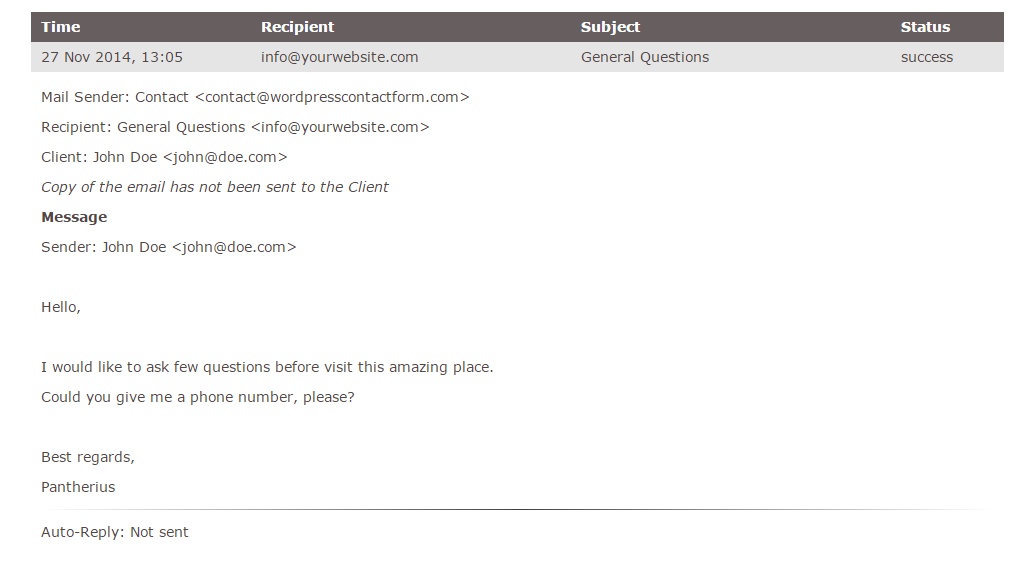
You can see an example log entry on the image at the left side. One log file contains almost all informations about the activity on the Contact Form. It is a good idea to enable logs for a while to test the email sending after you installed the plugin.
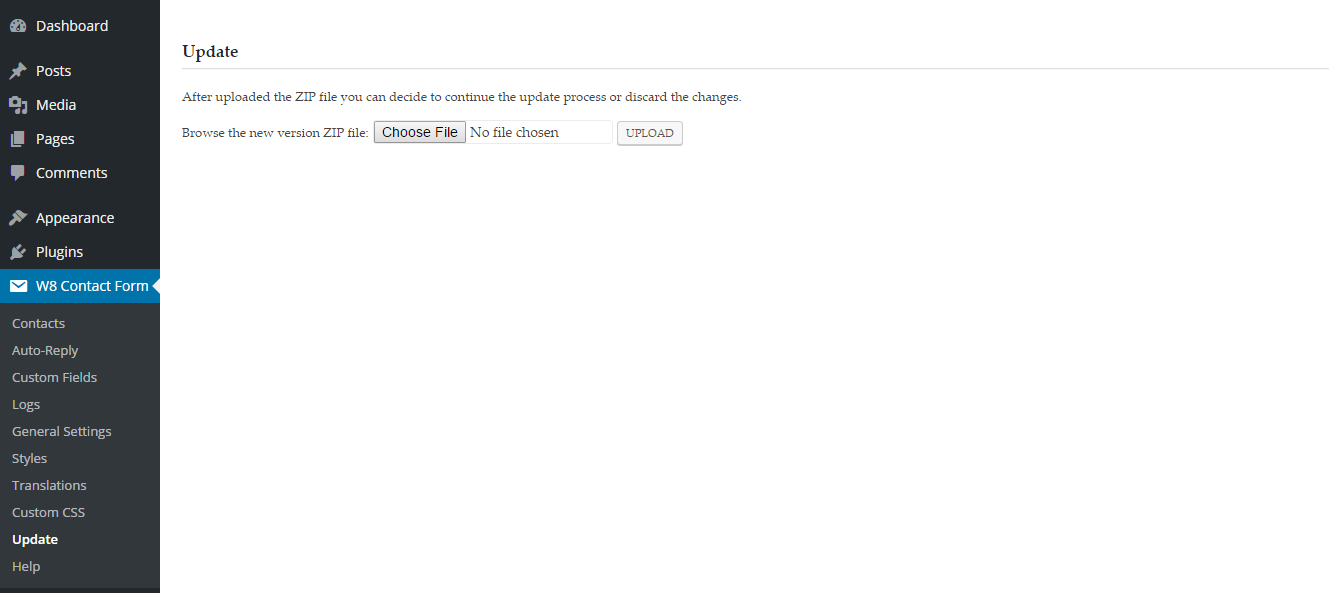
Update #back to top
There are several ways to update the plugin, read the detailed informations about the process below.
Update via the built-in Updater - #back to top
Download the new version ZIP file, then browse it from your computer. It needs to be the valid plugin ZIP file, therefore pay attention to use the appropriate file, otherwise the updater will be unable to update the plugin. Click on the Update button, that will show you the changelog, including the latest changes. Click on the Start Update button to finish the process.
Update via the WordPress Installer - #back to top
Set the Keep Settings after Uninstall option to ON in the General Settings. Deactivate and delete the plugin, then install the new version. This method will also keep all of your settings and configuration.
Update via FTP - #back to top
Overwrite the plugin file in your WordPress installation folder (wp-content/plugins/w8-contact-form) via FTP, then deactivate and activate back the plugin. The last step is required to apply all new changes that might provided with the new plugin version.
Tips & Tricks #back to top
Here are some useful hints, that can help you to use the plugin with more advanced way.
Open with Link
The contact form can be opened by clicking on a link, just needs to add a specific class to the link to make it work.
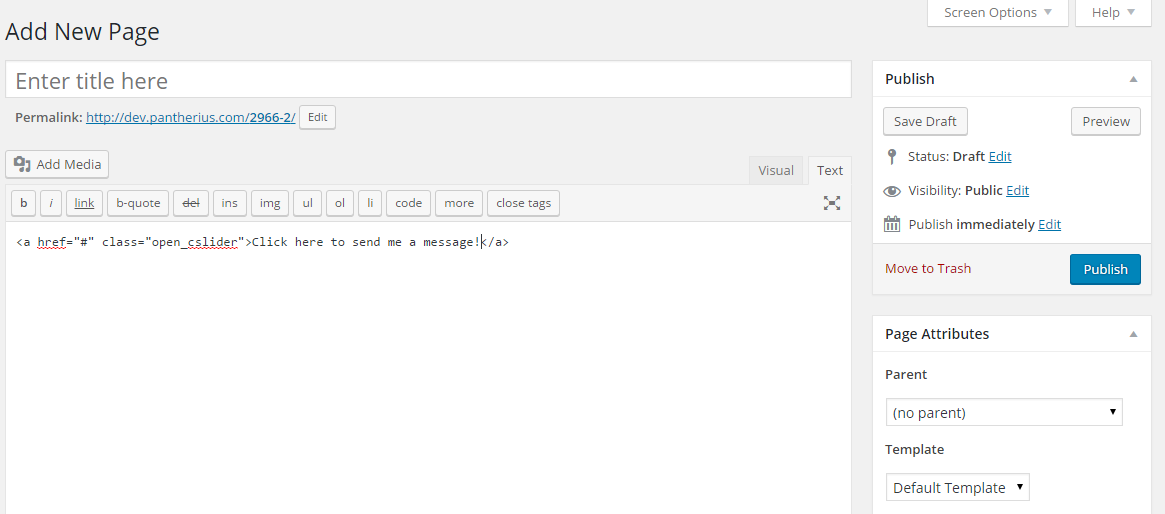
- classname: .open_cslider, method: open the Contact Form,
example: <a href="#" class="open_cslider">link text</a> - classname: .close_cslider, method: close the Contact Form,
example: <a href="#" class="close_contact_slider">link text</a> - classname: .hide_cslider, method: hide the Contact Form,
example: <a href="#" class="hide_cslider">link text</a> - classname: .show_cslider, method: show the hidden Contact Form,
example: <a href="#" class="show_cslider">link text</a>
Multiple Forms with Filtered Contacts
With the [w8contact_form] shortcode you can customize almost entirely the Contact Form. If you include this shortcode to two different pages, you can do it with absolutely different parameters to get unique forms. You can also use the Contacts wisely.
You can use the contact number to define the available contacts for the Form with the shortcode, for example: [w8contact_form contacts="1,3"] In this example, the W8 Contact Form will display the contacts with number 1 and 3 on this form. You can create more contact and specify other contact numbers for different shortcodes.
Developers
The plugin has some unique methods, therefore you can use the plugin with many of other purposes. Possible to use the following methods:
- initialize the plugin with default params: jQuery('body').cfslider();
- initialize the plugin with custom params (see the full list of available parameters in the cfs.js): jQuery('body').cfslider({'hide_icon':'true'});
- destroy (not possible to init again after destroy, you can use hide and show): jQuery('body').cfslider('destroy');
- hide the Contact Form: jQuery('body').cfslider('hide');
- show the hidden Contact Form: jQuery('body').cfslider('show');
- open the Contact Form: jQuery('body').cfslider('open');
- close the opened Contact Form: jQuery('body').cfslider('close');
- detect mobile (results true below 800x600px resolution): jQuery('body').cfslider('detectmob');
- resize the Contact Form to the original state: jQuery('body').cfslider('resize');
Shortcodes #back to top
Before you using the [w8contact_form] shortcode, make sure you set the Display globally option to OFF in the General Settings. You can insert the [w8contact_form] shortcode to any page/post to display the Contact Form. It has a lot of custom parameters. If you would like to use it with different options, just specify the parameter, like: [w8contact_form style="light"]
This is the full list of available parameters:
- hideicon="false" (true or false)
- lockscreen="true" (true or false)
- transparency="50" (number between 0 and 100)
- closeicon="true" (true or false)
- autoopen="true" (true or false)
- displayonce="true" (true or false)
- sendcopy="true" (true or false)
- hidephoto="false" (true or false)
- captcha="image" (image, math, hidden or disabled)
- disableonmobile="false" (true or false)
- verticaldistance="50" (number between 5 and 95)
- iconsize="small" (small, medium or large)
- direction="left" (left or right)
- iconurl="http://yourwebsite.com/photo.jpg" (empty or URL)
- animation="Quad" (Quad, Cubic, Quart, Quint, Expo, Sine, Circ, Elastic, Back, Bounce)
- reverseheader="false" (true or false)
- style="light" (light or dark)
- skin="minimal" (default or minimal)
- photostyle="rounded" (false, badge, bubble-left, bubble-right, door, leaf-left, leaf-right, rounded, rounded-left, rounded-right)
- photoborder="false" (false or RGB/HEX color code)
- iconanimation="0" (use 0 to disable, heartbeat to enable HeartBeat animation, enter a number in milliseconds to use the Shake animation, eg.: 5000)
- fontfamily="" (leave empty for default or use the Google Font Family name, like "Alex Brush")
- namefontsize="" (leave empty for default or font size, like "12px")
- titlefontsize="" (leave empty for default or font size, like "12px")
- descfontsize="" (leave empty for default or font size, like "12px")
- buttonfontsize="" (leave empty for default or font size, like "12px")
- fieldfontsize="" (leave empty for default or font size, like "12px")
- placeholder_name="Name" (specify the placeholder text for the Name field)
- placeholder_email="Email Address" (specify the placeholder text for the Email field)
- placeholder_message="Message" (specify the placeholder text for the Message field)
- placeholder_captcha="Enter the numbers" (specify the placeholder text for the Captcha field)
- text_send="SEND" (specify the text for the Send Button)
- text_sendcopy="Send copy to my email address" (specify the text for the 'Send me a copy' checkbox)
- text_success="Message sent successfully." (specify the message for the success message sending)
- text_failed="FAILED" (specify the message for the failed message sending)
- flat="false" (true or false)
- contacts="1,2" (contact numbers)
- bganim="disabled" (animation types, see the list below)
Lock the Screen
Use the following shortcode to lock the screen:
[w8contact_form lockscreen="true"]
Math Captcha
Use the following shortcode to use Math Captcha:
[w8contact_form captcha="math"]
Embed mode with Custom Contacts
Use the following shortcode to embed the Contact Form with custom contacts:
[w8contact_form flat="true" contacts="1,3"]
With flat parameter you can include the Contact Form directly to the content, therefore it won't appear on side of the screen, it will be embedded to the place of the shortcode. The contacts parameter allows to specify passive contacts and use different contacts with each forms. Save your contacts, set some of them to passive and use the contact numbers to set them in the shortcode.
Custom Background Animation
Use the following shortcode to set different background animation:
[w8contact_form bganim="cfs_movebottomright_zoomout"]
Skin and Style
Use the following shortcode to set custom skin and style:
[w8contact_form style="light" skin="minimal"]
Support#back to top
- * Answer for questions related with the plugin
- * Answering technical questions about item’s features
- * Assistance with reported bugs and issues
- * Help with included 3rd party assets
- * Customization Services
- * Installation Services
Please remember you purchased a very affordable plugin and you don't have to pay for a full-time web design agency for the developing. Occasionally, I will help with small tweaks, but these requests will be put on a lower priority due to their nature. Support is also 100% optional and I provide it for your convenience, so please be patient, polite and respectful.
Please visit my profile page or ask question in the plugin's the comments section
- * Make sure your question is a valid Plugin Issue and not a customization request.
- * Make sure you have read through the documentation before asking support on how to accomplish a task.
- * Make sure you double checked the plugin's FAQs.
- * Try disabling the other active plugins to make sure there isn't a conflict with any other plugins. If you found a conflict this way, you can let me know.
- * If you have customized your plugin and now have an issue, back-track to make sure you didn't make a mistake. If you have made changes and can't find the issue, please provide me with your changelog.
- * Almost 80% of the time we find that the solution to people's issues can be solved with a simple "Google Search". You might want to try that before seeking support. You might be able to fix the issue yourself much quicker than I can respond to your request.
- * Make sure to state the name of the plugin you are having issues with when requesting support via CodeCanyon.
F.A.Q. #back to top
Please unzip the downloaded file and use the second zip inside the first (next to the documentation folder) or download the Installable WordPress File Only
Version History ( Changelog ) #back to top
You can find the version history (changelog.txt) file in the plugin ZIP file: contact-form-slider.zip inside the downloaded file or you can check the changelog on plugin's page here.
If you have any questions that are beyond the scope of this help file, please feel free to email via my user page contact form here. With more general question relating to the plugins on CodeCanyon or with this plugin, you might consider visiting the comment section of this plugin, maybe somebody also faced with the same question.
Changelog
-----------------------------------------------------------------------------------------
Version 1.6 - 23/10/2022
-----------------------------------------------------------------------------------------
- fixed JS issue

-----------------------------------------------------------------------------------------
Version 1.5.9 - 17/05/2022
-----------------------------------------------------------------------------------------
- minor code optimization

-----------------------------------------------------------------------------------------
Version 1.5.8 - 10/08/2021
-----------------------------------------------------------------------------------------
- fixed Flower Light Blue skin with Light and Dark style
- issues identified by library management have been fixed

-----------------------------------------------------------------------------------------
Version 1.5.7 - 30/06/2020
-----------------------------------------------------------------------------------------
- added option to use link in custom fields

-----------------------------------------------------------------------------------------
Version 1.5.6 - 03/07/2019
-----------------------------------------------------------------------------------------
- fixed auto-reply admin page doesn't appear

-----------------------------------------------------------------------------------------
Version 1.5.5 - 16/02/2018
-----------------------------------------------------------------------------------------
- fixed color picker layout issue on admin

-----------------------------------------------------------------------------------------
Version 1.5.4
-----------------------------------------------------------------------------------------
- improved backend with floating submit
- fixed some CSS issues on mobile
- improved animations

-----------------------------------------------------------------------------------------
Version 1.5.3
-----------------------------------------------------------------------------------------
- fixed unnecessary box-shadow on custom checkboxes and radio buttons
- added 7 new skins (curved wood, decorated, elegant black, lines, pages 1, pages 2, wooden floor)
- fixed minor tranlation issue
- added TRPHONE as a static translatable custom field

-----------------------------------------------------------------------------------------
Version 1.5.2
-----------------------------------------------------------------------------------------
- changed icon H2 element to SPAN

-----------------------------------------------------------------------------------------
Version 1.5.1
-----------------------------------------------------------------------------------------
- fixed minor escaping issue with the contacts' details
- fixed auto-reply issue

-----------------------------------------------------------------------------------------
Version 1.5
-----------------------------------------------------------------------------------------
- added option to specify any number of email address for the contacts (comma separated list, added as CC in the email)

-----------------------------------------------------------------------------------------
Version 1.4.1
-----------------------------------------------------------------------------------------
- minor improvements frontend styles
- fixed SSL issue
- fixed demo contacts delete issue
- reconstructed the entire admin area
- reconstructed documentation
- added Custom CSS feature
- added ZIP Updater

-----------------------------------------------------------------------------------------
Version 1.4
-----------------------------------------------------------------------------------------
- added custom fields (text, textarea, select, checkbox, radio button, hidden field)
- minor visibility improvements
- fixed floating admin bar issue
- added option to set font weight for name, title, description, input fields and submit button (overwrite theme default)
- added option to set font color for the entire contact form and submit button (overwrite theme default)
- added option to set the background color for the entire contact form, submit button and submit button hover (overwrite theme default)
- fixed minor visibility issues
- added sender URL to message body
- improved frontend style
- added 10 new skins
- added transparent background to image captcha
- added full height slide option
- added YouTube icon
- fixed autoreply email address bug on admin
- added option to specify target div for background animation
- added option to use single contact without subject (hide subject selector)
- improved mail sending
- added option to install demo contacts

-----------------------------------------------------------------------------------------
Version 1.3
-----------------------------------------------------------------------------------------
- added 10 background animations
- improved mail sending
- improved display on large screens
- fixed minor visibility bugs
- fixed custom icon bug
- fixed minor bug with cookies

-----------------------------------------------------------------------------------------
Version 1.2
-----------------------------------------------------------------------------------------
- fixed minor visibility issues with light style
- fixed www domain prefix email sender bug
- decreased minimal character length of the name field to 2

-----------------------------------------------------------------------------------------
Version 1.1
-----------------------------------------------------------------------------------------
- added option to set font family (Google Fonts)
- added option to set name font size
- added option to set title font size
- added option to set description font size
- added option to set fields font size
- added option to set button font size
- updated documentation